Showing posts with label Design Patterns. Show all posts

Monday, April 6, 2020

Software Development Best Practices

SOLID PRINCIPLES

S - Single Responsibility Principle

An element of code (such as module, class or function) should do one primary thing and nothing else. That is, do not build Swiss army knife code elements. For example, a function that changes the case of a string should not trim it as well.

O - Open/Closed Principle

Do not alter the foundational code (such as base classes and common functions) but rather compose or extend them. Modules, classes and functions should be open for extension but closed for modification. The initial functionality should not be changed but may be extended via composition or inheritance.

L - Liskov Substitution Principle

Program to interfaces. Your business logic should be programmed against class interfaces (not concrete implementation of classes). A subclass should have "is a" relationship with the base class. Wherever you can use a base class, you should be able to use a derived class.

I - Interface Segregation Principle

Interfaces should be minimal and tailored to the function they need to perform. Minimize the number of methods in a given interface. Instead, expose multiple smaller interfaces. Clients can choose to implement just the interfaces they require.

D - Dependency Inversion Principle

Do not use concrete implementations directly. High level modules should not depend on lower level modules. Constructors for higher level modules should accept abstractions (interfaces) of lower level modules. At runtime, Dependency Container injects a concrete instance of the abstraction into the constructor.

SEPARATION OF CONCERNS

Similar to Single Responsibility Principle in SOLID but applied at a macro level (Systems, Modules, Sub-Systems). For example, a payment processing module should only perform payment processing and nothing else (i.e. it should not calculate invoices or bills).

DRY - DON'T REPEAT YOURSELF

Do not implement the same logic twice. Put it in a common module, library, class or function and use it everywhere.

Factor out common code into helper classes, methods and components. This makes the testing effort more concise and helps track down bugs to a single place in code instead of several repeating code sections.

MINIMIZE THE CODE YOU WRITE

Minimize the amount of code you have to write to solve a problem. The less code there is, the lesser the chance of buggy code. Code Minimization goes beyond DRY in that you may opt to look at alternate design approaches that minimize the amount of code you have to write to begin with. Remember code is a liability! The less code you have to solve the problem, the better. Examples:

  • Use a well established library or software package to solve the problem instead of writing code to do the same.
  • Use declarative code instead of imperative code. For example in .Net, instead of using for loops use LINQ.
  • Instead of using switch/case statements to select a value or action use a table driven approach to look up a value or execute an action (a database table or an in-memory data structure should do the trick).

YAGNI - YOU AREN'T GONNA NEED IT

Do not implement code that is not immediately needed now even if you think you might need it in the future (you probably won't or if you do, you will need something entirely different).

Don't anticipate features and try to adapt your design or code to the features that are not necessary to complete the stories at hand. The chances are that either the requirements will change over time or the features you anticipate are never really needed. Do the simplest thing that will work.

USE DESIGN PATTERNS

When writing code check if there is a well-known design pattern that can be used to make implementation more robust and maintainable. Design Pattern Examples

ORGANIZE YOUR CODE WELL

Use polymorphism (abstract class + derived classes) to implement specific behaviors instead of conditionals sprinkled all over the code to handle differing behaviors. Use a single switch to instantiate the polymorphic derived class of the desired behavior and have the controlling logic invoke the behavior in a general fashion that is applicable to the entire family of the derived polymorphic classes.

Keep methods (functions) short and single-purposed. Complex methods should be no longer than 20 lines. Simpler methods should be no longer than 10 lines.

Do not pass too many parameters into a method. When several parameters must be passed into a method, create a request object that contains the parameters and pass the request object into the method.

Name the methods purposefully. The name should clearly reflect what the method does. A comment for the method should ideally be unnecessary. Write code that reads like prose. Comments should not be necessary when reading the code. Refactor logic into smaller methods with descriptive names. When reading the main method, the reader should be able deduce the purpose of the helper methods being called and understand what the main method is trying to accomplish without reading the implementation of the helper methods.

Do not enter who changed the code or the what the ticket or issue number was in code comments. Such information belongs in the source control check-in comments.

GET HELP FROM THE COMPILER

Use strongly type variables and constructs (generics, for example) to detect problems as early as possible (at compile time instead of runtime). Use enumerations instead of string values. Use named constants instead of string literals. Pay attention to compiler warnings.

TESTABILITY

Write testable code

Structure and implement your code so that it is easily testable. This mind set will naturally help you write code that is loosely coupled and minimizes inter-dependencies. The loose coupling is essential for testing a class or a component in isolation as is necessary when writing Unit Tests.

Write automated tests

By all means write automated Unit Tests. Better yet, take the Test Driven Development (TDD) route. That is, devise and write your tests before you start developing. TDD will greatly help in the design of the system in addition to the more obvious benefit of having a more complete set of automated tests. Having good automated unit tests allow us to refactor our code confidently.

Integrate often - Fail fast

Don't sit on pending changes. Check them in right away to find any incompatible changes. It is better to fail fast and correct the problem earlier in the cycle than to sit on a change and having to figure out why things don't work due to a change you made last week.

REFACTORING

Groom (clean up) code without changing the underlying functionality often. Refactoring is essential for long term maintenance of the code and to facilitate future enhancements.

Over the time, the code will naturally decay. You will see violations of DRY, Minimize Code and even YAGNI principles. It is imperative to take time to periodically refactor the code to ensure its maintainability over time. Remove and discard dead code. Such code only adds noise to your code base. The lower the noise-to-signal (code) ratio, the better.

Tuesday, January 5, 2016

Database: Read, Modify, Write Pattern

Applies: When updating a record or item in a database

  1. Read item, remember the version number of the record (Vo)
  2. Validate if the update is allowed
  3. Update the record, and increment the version number (Vi)
  4. Replace the record in the data store only if the version in the data store is Vo
  5. If update fails, go to step 1

Tuesday, June 23, 2015

ASP.Net MVC: Using Unity IOC with MVC

1. Install Unity using Nuget

Unity bootstrapper for ASP.NET MVC
(This will install all dependencies as well)

2. MVC Unity adds the following files in App_Start

UnityMvcActivator.cs - Provides the bootstrapping for integrating Unity with ASP.NET MVC. The Start() and Shutdown() methods are automatically called when MVC application starts and stops (uses WebActivatorEx to do this automatically).

UnityConfig.cs - This is where you register the type mappings.
The registration is done in RegisterTypes() method. It can be done with code here or can be loaded from web.config.

Friday, June 5, 2015

Selecting an index based on hashed value of data

Background

Let's say we have 5 resources. We want to select one of these resources based on the incoming data (key).

String[] resources = new String[]
{
"Server 1",
"Server 2",
"Server 3",
"Server 4",
"Server 5"
};

Helper Methods


// returns an index based on a key
static int SelectIndex(String key, int totalIndices)
{
return (int)(GetInt64HashCode(key) % (ulong)totalIndices);
}

// helper method to calculate a numeric hash for a string
static UInt64 GetInt64HashCode(string str)
{
UInt64 hashedValue = UInt64.MaxValue / UInt32.MaxValue;
 UInt64 hashedValueMultiplier = UInt64.MaxValue / UInt16.MaxValue;
for (int i = 0; i < str.Length; i++)
{
hashedValue += str[i];
hashedValue *= hashedValueMultiplier;
}
return hashedValue;
}

Test

{
"Server 1",
"Server 2",
"Server 3",
"Server 4",
"Server 5"
};

Dictionary<int, int> selectionDistribution = new Dictionary<int, int>();
for (int i=0; i<resources.Length; i++)
{
selectionDistribution.Add(i, 0);
}

int keyCount = 10000;
for (int i = 0; i < keyCount; i++)
{
String key = Guid.NewGuid().ToString();
int selectedIndex = SelectIndex(key, resources.Length);
selectionDistribution[selectedIndex] = ++selectionDistribution[selectedIndex];
Console.WriteLine("{0} goes to {1}", key, resources[selectedIndex]);
}

Console.WriteLine("*** Distribution ***");
foreach(KeyValuePair<int, int> pair in selectionDistribution)
{
Console.WriteLine("{0}: {1}", resources[pair.Key], pair.Value);
}
Console.ReadKey();

Output

21b33e71-9bb6-49c9-a8f1-b435a0896596 goes to Server 3
9453c55f-409c-45f0-9941-fc5623c8d5da goes to Server 4
e26eef17-e357-4c22-b546-9a9a3329fc5b goes to Server 1
f2a516d6-5bed-4736-abad-e508d77d1c12 goes to Server 1
0fe01f0d-1860-4358-80ab-c7f27ab400ca goes to Server 4
.....
....
704441d5-7f2f-444a-90ea-60478fcebb85 goes to Server 4
c2b7ec3f-2d48-49f2-aa0d-541ea6c464d4 goes to Server 3
1fc81dce-4e5b-41b7-bd49-fe9abefffcda goes to Server 1
*** Distribution ***
Server 1: 2036
Server 2: 1962
Server 3: 1986
Server 4: 2035
Server 5: 1981

Wednesday, June 3, 2015

Generating meaningful invoice numbers

Problem

You want to generate invoice numbers for a customer.

General Approach

Commonly, a global or customer-specific integer counter is maintained for generating invoice numbers. The next number in the counter sequence is used as the invoice number when generating a new invoice.

A Different Approach

We can add more meaning to the invoice number generated for a customer. Here's one such approach that contains the customer identifier and the time an invoice was generated. The invoices numbers increase over time and hence can be sorted in ascending order.

public static String TimeBasedIdentifier(this string customerId)
{
  var now = DateTime.UtcNow;
  string dateStamp = now.ToString("yyMMdd");
  long elapsedSecondsToday = (long)(now - now.Date).TotalSeconds;
  return String.Format("{0}-{1}-{2}",
     customerId, dateStamp, elapsedSecondsToday.ToString("D5"));
}

Sample Output for customer 10000:
10000-20150603-68650

Limitation

This approach generates unique invoice numbers for a given customer as long as we do not generate more than one invoice per second for a given customer. We can use TotalMilliseconds (instead of TotalSeconds) if we want higher precision.

Tuesday, June 2, 2015

Using Memcached or Amazon Elasticache

Memcached is a central cache service that can hold string value pairs.

Memcached is run as a daemon or service on a machine. This machine becomes your Memcached server.

Memcached is accessed on port 11211

To play with Memcached, you will need to:
  1. Install a Memcached Server
  2. Use a Memcached client library to access the server

Install a Memcached Server as a Windows Service

http://downloads.northscale.com/memcached-win32-1.4.4-14.zip
http://downloads.northscale.com/memcached-win64-1.4.4-14.zip

c:\memcached\memcached.exe -d install
c:\memcached\memcached.exe -d start

Access the Memcached Server

1. Create a Windows Console Application

2. Install Nuget package
Install-Package EnyimMemcached

3. Add Memcached server's configuration to app.Config file

<?xml version="1.0" encoding="utf-8" ?>
<configuration>
  <configSections>
    <sectionGroup name="enyim.com">
      <section name="memcached" type="Enyim.Caching.Configuration.MemcachedClientSection, Enyim.Caching" />
    </sectionGroup>
  </configSections>

  <startup>
    <supportedRuntime version="v4.0" sku=".NETFramework,Version=v4.5" />
  </startup>

  <enyim.com>
    <memcached protocol="Binary">
      <servers>
        <!-- make sure you use the same ordering of nodes in every configuration you have -->
        <add address="127.0.0.1" port="11211" />
      </servers>
    </memcached>
  </enyim.com>
  
</configuration>

4. Write code to access the Memcached Server.
static void Main(string[] args)
{
using(MemcachedClient client = new MemcachedClient())
{
var key = "LastProcessed";
var val = DateTime.Now.Ticks; ;

Console.WriteLine("Storing Key: {0}, Value: {1}",
key, val);
client.Store(StoreMode.Set, key, val);

Console.WriteLine("Retrieved Value: {0}, Key: {1}", 
client.Get<long>(key), key);
}
}

Amazon Elaticache

Elasticache is Amazon's implementation of Memcached in the cloud.

Provision an Amazon Elasticache Cluster via AWS Console. Configure the cluster to allow access to it by other EC2 instances in the VPN (Network Security Group).

For the referenced security group, allow inbound traffic for:
TCP, port 11211 from anywhere
SSH, port 22, from anywhere

You will not be able to access the cluster from your local machine (only from EC2 instances in the same VPN).

Change the Memcached configuration (address and port) in app.Config to access Elasticache.

Wednesday, January 14, 2015

Entity Framework: Code and Database Separate Approach

The use of EF designers is optional. You can totally design your database and code separately and independently. You are not required to use any EF designers to reap most of the benefits of the Entity Framework. Here are the general steps for  the Code and Database Separate Approach.
    1. Database: Create and optimize your database as you would normally.
    2. .NET: Create POCO classes (not interfaces) that correspond to database objects. Foreign key references become collections of referenced objects in the POCO instance.
    3. Create a DBContext derived class. Add DBSet<POCO_EntityType> members to DBContext for each DB table/view.
    4. Use methods of DBContext to hydrate DBSets and perform LINQ queries (rich, intuitive, composable, and type safe; paging is supported via Skip and Take) against the DBSets. EF generates and executes appropriate SQL against the database.
    5. You can provide hints to EF, if the default (convention-based) mapping of POCOs to DB objects used by EF is not what you expect. This can be done via attributes (data annotations) or via code.
    6. If you modify the database, simply make corresponding changes to your POCO classes.

Quick Start

If you already have a database and want to create POCO classes from the database, use the Entity Framework Power Tools. Once POCO classes are created fix up the namespaces, move the classes to appropriate project, and make future changes manually, in a controlled fashion. 

Wednesday, November 19, 2014

SOLID Principle for Software Development

S - Single Responsibility Principle

A module, class or function should do one primary thing and nothing else.

O - Open/Closed Principle

Modules, classes and functions should be open for extension but closed for modification. The initial functionality should not be changed but may be extended via composition or inheritance.

L - Liskov Substitution Principle

A subclass should have "is a" relationship with the base class. Wherever you can use a base class, you should be able to use a derived class.

I - Interface Segregation Principle

Minimize the number of methods in a given interface. Instead, expose multiple smaller interfaces. Clients can choose to implement just the interfaces they require.

D - Dependency Inversion Principle (DIP)

High level modules should not depend on lower level modules. Constructors for higher level modules should accept abstractions (interfaces) of lower level modules. At runtime, Dependency Container injects a concrete instance of the abstraction into the constructor.

Additional Resources
https://www.digitalocean.com/community/conceptual_articles/s-o-l-i-d-the-first-five-principles-of-object-oriented-design

Monday, June 10, 2013

Dynamic Programming

Dynamic programming (DP) is a style of programming suited for combinatorial optimization (for example, the knapsack problem). Instead of using brute force to try every possible combination to solve a problem, an implementation based on dynamic programming optimizes the solution by computing and caching intermediate results in order to avoid redundant computations. Recursion can be used exclusively to solve such a problem but at a higher computational cost.
Let's calculate a couple of members in the Fibonacci series using recursion and DP.

Fibonacci sequence

Fn = Fn-1 + Fn-2

1, 1, 2, 3, 5, 8, 21, ...

where the next number in the sequence is the sum of the previous two numbers.

Objective

Calculate the sixth and seventh number in the Fibonacci series. The corresponding numbers in the series are 8 and 21.

Fibonacci sequence using recursion

public int Calculate(int n)
{
    if (n <= 2)
        return 1;
    else
        return Calculate(n - 1) + Calculate(n - 2);
}

Call Stack - Calculate(6)

Calculate(6)
Calculate(5)
Calculate(4)
Calculate(3)
Calculate(2)
Calculate(1)
Calculate(2)
Calculate(3)
Calculate(2)
Calculate(1)
Calculate(4)
Calculate(3)
Calculate(2)
Calculate(1)
Calculate(2)

Call Stack - Calculate (7)

Calculate(7)
Calculate(6)
Calculate(5)
Calculate(4)
Calculate(3)
Calculate(2)
Calculate(1)
Calculate(2)
Calculate(3)
Calculate(2)
Calculate(1)
Calculate(4)
Calculate(3)
Calculate(2)
Calculate(1)
Calculate(2)
Calculate(5)
Calculate(4)
Calculate(3)
Calculate(2)
Calculate(1)
Calculate(2)
Calculate(3)
Calculate(2)
Calculate(1)

The Issue - Inefficiency

As n increases, so do the number of recursions to solve the problem. Compare the number of calls to Calculate() method in the two stack traces. Note the redundant calls to Calculate methods for n=5 and n=4.
Using recursion Fib(n) is solved in exponential time.

T(n) = T(n-1) + T(n-2) + Θ(1)

// Θ(1) constant part

Fibonacci sequence using DP

int?[] m_CachedResults = new int?[short.MaxValue + 1];
     
public int DPCalculate(int n)
{
    m_CachedResults[1] = 1;
    m_CachedResults[2] = 1;

    if (m_CachedResults[n] != null)
    {
        return m_CachedResults[n].GetValueOrDefault();
    }
    else
    {
        m_CachedResults[n] = Calculate(n);
        return m_CachedResults[n].GetValueOrDefault();
    }
}

private int Calculate(int n)
{
    if (n <= 2)
        return 1;
    else
    {
        if (m_CachedResults[n] != null)
            return m_CachedResults[n].GetValueOrDefault();
        else
            return Calculate(n - 1) + Calculate(n - 2);
    }
}

Call Stack - Calculate(6)

Calculate(6)
Calculate(5)
Calculate(4)
Calculate(3)
Calculate(2)
Calculate(1)
Calculate(2)
Calculate(3)
Calculate(2)
Calculate(1)
Calculate(4)
Calculate(3)
Calculate(2)
Calculate(1)
Calculate(2)

Call Stack - Calculate (7)

Calculate(7)
Calculate(6)
Calculate(5)
Calculate(4)
Calculate(3)
Calculate(2)
Calculate(1)
Calculate(2)
Calculate(3)
Calculate(2)
Calculate(1)

Result - Efficiency

Since the program utilizes DP and caches intermediate values (memoized values), the calculation of the subsequent fibonacci numbers in the sequence is much more efficient. As the cache results get filled out, the algorithm becomes progressively more efficient.

Memoized calls are constant Θ(1)
For a given n, only one recursion cycle is used. Over time and multiple accesses, this is essentially constant. Therefore, the DP algorithm for Fibonacci calculation is linear (n).

Saturday, June 23, 2012

Inversion of Control (IoC) and Dependency Injection (DI)

The Scenario

We have a pretty good idea of what tasks various components of a system must perform but we may want to change the precise way those tasks are carried out by the components at a later time.

The Solution

  • Define interfaces (service contracts) for each component. These interfaces specify the commands and parameters a system must provide to a component that implements a given interface
  • At development time, use the well-defined interfaces to establish the interaction and collaboration between these components
  • At configuration or run time, inject concrete implementations of these interfaces to carry out the actual work

Basic Principles

Inversion of control

Inversion of control is a mechanism by which we can make the higher level modules depend on abstractions rather than concrete implementation of lower level modules.

Dependency injection

Dependency injection is used to reduce the coupling between classes and to move the binding of abstraction and concrete implementation out of the dependent (high level) class. The concrete implementation can be bound to high level class:
  1. By injecting instance(s) of concrete implementation into the high level class constructor
  2. By calling a method on the high level class that takes concrete implementation instance(s) as an argument
  3. By setting a property on the high level class that holds a reference to concrete implementation instance

Implementation Details

Inversion of Control Container (Ioc Container)

  • Use a central repository to register all components that implement the interfaces required to run the system
  • At runtime lookup, by service contract, configured/desired components that implement the functionality required of the system

Dependency Injection

  • Once an appropriate component is identified for each collaborator's interface in the system, create an instance of that component by creating and injecting required parameters into component constructor and/or by setting optional properties of the component
  • Let the system orchestrate the interaction between these concrete instances of the component

IoC and DI Frameworks

There are several prebuilt frameworks available that provide an IoC container as well as Dependency Injection.
  • Castle Windsor and MicroKernel
  • Spring.NET
  • StructureMap
  • Unity
  • Ninject
  • ObjectBuilder

Wednesday, January 19, 2011

Model-View-Presenter (MVP)

The main purpose of the Model-View-Presenter (MVP) design pattern is to separate domain and application-specific logic (the Model) from the user interface (the View) of the application. The advantages of this separation of concerns are three-fold:

1. Domain logic is not dispersed in the user interface code. When domain logic is strongly coupled with the user interface code, there is a high likelihood of code duplication. Less duplication facilitates debugging, maintenance, enhancements and promotes code reuse.

2. The user interface can be changed independently of the Model in many cases where the application requirements have not fundamentally changed. For example, to enhance usability it may be desirable to change a spin control to a slider control. Similarly, the actual implementation of the Model may be changed to use a different persistence model or to use a smarter algorithm

3. Last but not least, the separation of domain logic from the user interface greatly facilitates unit testing of the code.

Now that we have established the goals and benefits of separating domain and application-specific logic (the Model) from the user interface (the View), let’s delve into how MVP design pattern is useful. It is noteworthy that there are several variations of MVP and its predecessor Model-View-Controller (MVC) design pattern. For the purpose of this discussion, we will let our intuition derive a practical variant of MVP. To begin, we pose this question: Based on the goals and benefits of separating domain and application-specific logic from the user interface, what are some of the desirable attributes of an implementation? We explore this question through a few concrete examples:

1. We want to be able to change the gadgets and controls used on the View without massive refactoring of the code.

2. We want to be able to use a desktop database for one version of our application and a client-server database for another version of our application without having to duplicate too much code.

3. Based on a user, we want to display only certain fields on the View.

4. For an advanced user we want multiple views to show the same information in different ways (for example, a chart and a grid). We want these views to remain synchronized when any of the views are updated.

It is evident from the examples above that we need a degree of separation between the View and the Model. This is where the Presenter comes into the picture. Presenter is essentially the go-between the View and the Model. So what would we expect a Presenter to do? Here are some common tasks suited for the Presenter:

1. Create and display the View

2. Obtain data from the Model and pass it along to the View for display to the user

3. Be aware when a User modifies data on the View. Presenter may need to update the Model or ask the Model for recalculation of some sort. Presenter may need to update some other portion of the View as a result. The View handles basic user interaction (processing of keystrokes to accept data from the user) whereas the Presenter is responsible for making application-specific responses (update the Model and triggering a recalculation).

Now let’s examine some things the players in the MVP implementation must not do:

1. Presenter must not call or manipulate the widgets (controls) on the View directly. We want the ability to swap one implementation of the View with another. If the Presenter called methods on the widgets (controls) directly, this ability will be compromised.

2. View must not manipulate the Model directly. Recall it is the job of the Presenter to marshal the data between the Model and View. This might seem a bit cumbersome but in the bigger scheme of things it is desirable to separate the Model from the View. For example, if there is a need to change the Model later, we will need to change the Presenter and the View code as apposed to just the Presenter code.

We now see dependencies and interactions developing among the players in an MVP implementation:

1. Presenter relies on the View and the Model. Presenter is responsible for preparing and formatting the data suitable for display by the View. The Presenter provides this data to the View through a well-defined interface. The View is responsible for actual visualization of data for the user. The Presenter is also responsible for retrieving any modified data from the View. The Presenter is responsible for preparing and formatting the data suitable to be passed onto the Model for further processing or persistence. Again, the data is passed to the Model through a well-defined interface.

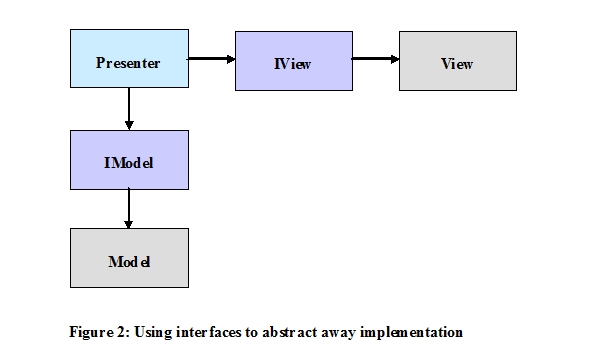
2. The implementation of the View and the Model shall remain independent of the Presenter. To achieve this, we need well-defined interfaces for the View and the Model that the Presenter can talk to. Any View or Model that implements an interface expected by a Presenter can be readily plugged into implementation.

3. The Presenter is also an observer of the events that occur in the View and the Model. Consequently, the View and the Model must publish events that the Presenter can subscribe to. For example, a Presenter may subscribe to a new user data entry event published by the View. Upon receiving notification of such an event, a Presenter may update the Model. A Presenter may also subscribe to data change event published by the Model. For example, if the Model changes due to some outside operation, the Presenter is made aware of the change and can accordingly update the View. Using this mechanism, a Presenter can even manage multiple Views and keep them synchronized.

Figure 1 summarizes the dependencies discussed above.


To be precise, the Presenter interacts with a Model and View that implement interfaces expected by the Presenter. We call these interfaces IModel and IView, respectively in Figure 2. Any View or Model that implements the interfaces expected by the Presenter can be plugged into the implementation.


Finally, let’s put everything together. We begin with construction of a Presenter object. The Presenter object either takes a View and a Model object as arguments in its constructor or instantiates these objects in the constructor. Usually there is a method called Initialize() on the Presenter object that sets the wheels in motion. Presenter.Intialize() creates the View and provides data to the View obtained from the Model. The Presenter then displays the View to the user. The Presenter also subscribes to events of interest published by the View and the Model. Upon receiving such events, the Presenter takes appropriate actions such as updating portions of a View or updating the Model.

Figure 3 shows a sequence diagram summarizing what happens when a user updates data on a View.


The user enters data in one of the controls displayed by the View. The View notifies the Presenter of this data entry. The Presenter asks the View for the updated value. Finally, the Presenter formats this data appropriately and passes it onto the Model for persistence.

Figure 4 shows how the Presenter reacts when the Model is changed externally.

A change is detected by the Model as a result of an outside operation such as an update to the database or an update to the Model by another component. The Model notifies the Presenter of the change. The Presenter obtains the updated data from the Model. The Presenter properly formats the data and passes it onto the View for display to the user. Note if the Presenter is managing multiple Views, the Presenter is in an excellent position to update and synchronize all the Views it is managing.

The apparent disadvantage of using MVP is the extra coding involved in separating the Model, View and Presenter. However, for most applications that involve user interaction, time invested in implementing MVP is well worth the benefits that come with separating domain and application-specific logic from the user interface.

Tuesday, January 18, 2011

Strategy Pattern

What

Encapsulate a family of algorithms or behaviors into a set of interchangeable classes. The algorithm/behavior classes are made interchangeable via concrete implementations against a common algorithm/behavior interface.

Why

The algorithm/strategy classes can be modified independent of the classes that use them as long as they adhere to the original interface they implemented.
Code duplication is minimized because the same algorithm or behavior does not need to be implemented in each individual class that needs to have that algorithm/behavior.
The algorithm/behavior of the classes can be dynamically set at runtime via constructor injection or a setter property.

How

Say we need to apply a promotional discount to the total invoice amount. The promotional discount can vary based on the marketing campaign in effect.
interface IPromoDiscount
{
  decimal ApplyDiscount(decimal amount);
}
// The logic to apply discount is encapsulated here
class PromoDiscount : IPromoDiscount
{
  decimal m_DiscountRate;
 
  private PromoDiscount() {}
 
  public PromoDiscount(decimal discountRate)
  {
    this.m_DiscountRate = discountRate;
  }
 
  public decimal ApplyDiscount(decimal amount)
  {
    return (amount * (1 - m_DiscountRate));
  }
}

class Invoice
{
  // invoice does not know about the real implementation
  // of IPromoDiscount
  IPromoDiscount m_PromoDiscount;
 
  private Invoice() {}
 
  // Injecting the 'algorithm' to calculate discount
  public Invoice(IPromoDiscount promoDiscount)
  {
    this.m_PromoDiscount = promoDiscount;
  }
  private decimal CalculateSumOfAllInvoiceLines()
  {
    ...
  }
 
  public decimal InvoiceTotal
  {
    get
    {
       return m_PromoDiscount.ApplyDiscount(CalculateSumOfAllInvoiceLines());
    }
  }
}
// Specify the discount to apply for an Invoice
// The same Invoice class can be used without modification
// for all three discount scenarios
Invoice invoiceNoDiscount = new Invoice(new PromoDiscount(0M));
Invoice invoiceWithTenPercentDiscount = new Invoice(new PromoDiscount(0.10M));
Invoice invoiceWithTwentyPercentDiscount = new Invoice(new PromoDiscount(0.20M));

OO Concepts - Abstraction, Inheritance, Polymorphism, Encapsulation (AIPE)

Abstraction

Abstraction is describing the essential and omitting the irrelevant. Abstraction principle is used when modeling the problem domain using class objects and the interaction between these class objects. Abstraction implores us to describe our design in terms of the problem domain instead of getting bogged down in implementation details.

Inheritance

Inheritance is a mechanism whereby the functionality of existing (base) classes is reused by new (derived) classes. Inheritance allows us to share the data and behavior of one abstraction into another. The derived class reuses the behavior of the base class and overrides such behavior when necessary to create a specialized version of the base class.

Polymorphism

Polymorphism literally means having multiple forms. Using inheritance, a class can be used as more than one type; it can be used as its own type, any base types, or any interface type if it implements interfaces. Polymorphism allows a programmer to treat a derived class just like its parent class even though the derived class may have redefined the behavior of its base class.

Encapsulation

Encapsulation is the process by which details that do not contribute to its abstraction are hidden. Encapsulation means hiding of information that is not relevant to the outside world. Encapsulation when applied to design of a class is a technique to hide low-level details of the class from the users of the class. Only what is meaningful to the user of the class is exposed through public members. The rest is kept private and can be changed independently of the users of the class.

OO Principles

Encapsulate that varies
Place functionality that may change into a separate class that can be utilized by other classes.

Favor composition over inheritance
Composition facilitates better reuse of code, results in less code duplication, and has fewer side-effects than inheritance. Instead of defining a common behavior in the base class, encapsulate that behavior in a separate class that can be utilized by classes in the inheritance hierarchy through composition.

Program to interfaces, not implementations
Encapsulate functionality into a class that implements an interface. The user of the functionality is coded against the interface of the class, not its concrete implementation.

Loose Coupling
When two or more classes or family of classes need to collaborate, share as little implementation details of classes with each other as possible. There are several techniques to achieve loose coupling. For example, program to interfaces instead of concrete class implementations. This allows us to swap class implementations without having to change the code that is written against an interface. When applicable, Observer Pattern is another way to achieve loose coupling where the Subject knows very little about its Observers and begins and ends its relationship with its Observers at runtime.

Open-Closed Principle
This principle advocates a design that is extensible without having to make modifications to existing code. Decorator Pattern illustrates the application of this principle very well.

Application Archetypes

Online transaction processing systems - OLTP
  • Low latency
  • High responsiveness
  • Data integrity
  • Predefined UI worflows
  • Examples: crm systems, e-commerce sites, e-banking systems
Analysis systems - online analytical processing - OLAP
  • Produce complex analytical customizable queries
  • Large multidimensional datasets
  • Low latency response
  • Examples: Business intelligence systems
Batch systems
  • Perform operations on large datasets efficiently
  • Job execution coordination to maximize CPU utilization
  • Auto recover from exceptions
  • Examples: Billing systems, provisioning systems

Sunday, August 15, 2010

MapReduce

MapReduce is used to process large data sets. It comprises of two steps.
  1. Use a Map function to break-down original (large) data sets into key/value pairs. These are the intermediate key/value pairs.
  2. Use a Reduce function combine the intermediate key/value pairs to arrive at the final answer
MapReduce lends itself very well to parallel processing. Multiple clusters of compute nodes can independently work on different segments of data during both the Map and Reduce steps.

Example

Objective

Produce a word count from a large text corpus


Map Step

  • Iterate through all documents in the corpus. For each document:
    • Parse words
    • Create a key (word) /value (count, 1) pairs for each word found

Reduce Step

  • Sum together counts for all intermediate keys (words) to arrive at count for each word in the corpus
Hadoop MapReduce is a programming model and software framework for writing applications that rapidly process vast amounts of data in parallel on large clusters of compute nodes.
See: http://hadoop.apache.org/mapreduce/

Sunday, July 11, 2010

Observer Pattern

What

Let's say we have an object O whose state may change at anytime. There are other objects in our system that are interested in knowing when the state of object O changes. What we need is a way for object O to notify all the interested objects when its state changes. The Observer Pattern facilitates exactly that. It defines a one-to-many relationship between objects such that when one object changes its state, all dependent objects are notified. There are two kinds of the participants in the Observer Pattern:

  1. The Subject also known as the Observable or the Publisher
  2. The Observers also known as the Subscribers
The Observers register themselves with the Subject. The Subject notifies the registered Observers when a change in its state occurs. The order of notification to the registered Observers by the Subject is non-deterministic. That is, an Observer does not know whether it received the update notification from the Subject before or after other Observers.


Why

The biggest benefit of the Observer Pattern is the loose coupling between the Subject and the Observers. As long as the Observers implement an update notification interface supported by the Subject, they may register themselves for the update notifications. Conversely, the Observers know the Subject through Subject's well-defined interfaces. An Observer may unregister with the Subject if it is no longer interested in the notifications.


How

interface IObservableSubject
{
  void RegisterObserver(IObserver observer);
  void UnRegisterObserver(IObserver observer);
  void NotifyObservers();
}
interface IObserver
{
  void Update(IObservableSubject observableSubject);
}

A concrete ObservableSubject class implements the IObservableSubject interface along with its other core functionality. Internally, ObservableSubject object keeps a list of registered Observers and notifies them by calling their Update() method. Once notified of the update, the Observer objects may call query methods on the ObservableSubject object to retrieve the state they are interested in.

A concrete Observer class implements the IObserver interface along with its other core functionality. The Observer class gets a reference to the concrete ObservableSubject class through its constructor. Typically in its constructor, the Observer object adds itself to the list of observers maintained by the ObservableSubject object by invoking the IObservableSubject::RegisterObserver() method.

The implementation of Observer Pattern through interfaces is preferred over inheritance because an interface allows us to turn existing classes into Observers by simply implementing the IObserver interface. The same argument holds true when turning an existing class into an ObservableSubject by implementing the IObservableSubject interface.

Friday, June 4, 2010

Decorator Pattern

What

Decorator Pattern is used to extend existing functionality through composition instead of inheritance. Decorator Pattern can be used to intercept and modify the behavior of an existing class object. For example, say client code uses class object XYZ that implements an interface, ISomeInterface. Currently, the client code instantiates class object XYZ and uses it through its ISomeInterface. XYZ is almost perfect for us except a few behaviors we would like to tweak. We do not want to touch the code for XYZ because it has been tested and has been functioning well. Furthermore, we do not want to substantially change the client code that uses XYZ. Following the Decorator Pattern, we implement a new class KLM that implements ISomeInterface. KLM contains an instance of XYZ class object. KLM delegates the desired behavior to the contained XYZ class object but overrides undesired behavior where necessary. The only change that the client code needs to make is to instantiate KLM instead of XYZ and use it through its ISomeInterface as before.

Decorator Pattern can be applied in a variety of modeling scenarios. Let's say we have an application that calculates the price of a car. There is the base price of the car and then there are additional costs for options such as sports suspension, all weather package and so on. The base price and the price of options may vary independent of each other. Further, the list of available options may change over time. Decorator Pattern is one way to model this kind of scenario.

One way to visualize how the Decorator Pattern works is to visualize an onion. An onion has layers. Let's say the cost of each layer in the onion is different. The cost of the onion is equal to the cumulative cost of all layers. This visualization of the onion costing is not all that different from the car pricing scenario described above. We start with the base model for the car and decorate or wrap it with options. To calculate the total price of the car, we ask the outermost layer what is your cost. The outermost layer asks the layer next to it: what is your cost and adds to its own cost. The inner layer in turn asks the layer next to it what is your cost and adds to its own cost and so on.

In the car pricing example, we can think of the base price and options as just car components. We wrap each component around another component until we have the car with the desired options. We ask the outermost car component to calculate its cost which in turn requests the cost from inner components to calculate the total cost of the car.

The salient features of the Decorator Design Pattern are as follows:

Common Super Type

All decorators used in a scenario derive from the same type or implement the same interface so that they can be used interchangeably. For the car pricing example, all car components implement the same interface in the code example below.

Composition

Each concrete implementation of a decorator contains a reference to the class object that it wraps. The object that a decorator wraps has the same super type as the decorator. For the car pricing example, the innermost decorator would not be wrapping or decorating anything because it is the base price for the car.

Delegation

Each decorator knows how to compute itself but delegates the computation of the decorator objects it wraps to the wrapped objects themselves.


Why

The decorator objects are independent of each other except that they share a common super type or interface. We can leave existing class implementations untouched while extending their behavior through composition and delegation. A decorator does not care about how many other decorators there are in its family. At runtime, a client can create a custom scenario or configuration by composing desired decorators. When new decorators are needed, they are simply implemented and used by the client following the same pattern as before. This is a perfect example of extension of functionality without modification to existing code (decorators). In object oriented terms, this is an application of the open-closed principle. The design is open for extension but closed to modification of existing decorator classes. In the car pricing example above, if we used inheritance instead of composition, the open-closed principle would be much harder to follow. By using the Decorator Pattern, we can implement additional options (decorators) for the car without having to touch code for existing options (decorators).


How

// Common interface all decorators in our car example implement
interface ICarComponent
{
  decimal Cost();
}

// Implements common functionality for all Car Components
abstract class CarComponent : ICarComponent
{
  protected decimal m_ThisComponentCost;
 
  public CarComponent (decimal thisComponentCost)
  {
    this.m_ThisComponentCost = thisComponentCost;
  }
 
  public decimal Cost()
  {
    // m_ThisComponentCost is set by the constructor
    decimal cost = m_ThisComponentCost;
   
    // Cost of the car component this component decorates
    if (m_CarComponent != null)
        cost += m_CarComponent.Cost();
    return cost;
  }
}

// Base Price for the car
class AMWTurboBasePrice : CarComponent
{
  public AMWTurboBasePrice ()
    : base (33000m)  // base price for the car
  {
    this.m_CarComponent = null;
  }
}

// Pricing for Sports suspension
class SportsSuspension : CarComponent
{
  public SportsSuspension (ICarComponent carComponent)
     : base (4000m)  // price for sports suspension
  {
    this.m_CarComponent = carComponent;
  }
}
// What is the price of AMWTurbo with sports suspension
ICarComponent basePrice = new AMWTurboBasePrice();
ICarComponent basePriceWithSportsSuspension =
  new SportsSuspension(basePrice);
Console.WriteLine(
   String.Format("The cost of car is {0}", basePriceWithSportsSuspension.Cost());
  
// All Weather package just became available for our car  
// We implement a new decorator
class AllWeatherPackage : CarComponent
{
  public AllWeatherPackage (ICarComponent carComponent)
     : base (2000)  // cost of all-weather package
  {
    this.m_CarComponent = carComponent;
  }
}
// What is the price of the AMWTurbo with
// sports suspension AND all weather package
ICarComponent basePriceWithSportsSuspensionAndAllWeatherPkg =
   new AllWeatherPackage(basePriceWithSportsSuspension);
Console.WriteLine(
   String.Format("The cost of car is {0}",
   basePriceWithSportsSuspensionAndAllWeatherPkg.Cost());